Ever had guests show up unexpectedly, only to find your drinks warm? Or maybe you’re thirsty for a cold drink on a hot day but don’t have time to wait. The freezer is slow, and the fridge can’t cool drinks fast enough when you need them.
There’s a simple trick that chills cans in just 2 minutes. It uses ice, salt, and water to cool drinks quickly. This method isn’t just a trick; it’s based on science. It’s faster than regular ice baths, which take 10 minutes.
This trick doesn’t need any special tools or expensive gadgets. You’ll learn why it works, how to cool different drinks, and tips to make them even colder. It’s perfect for parties or when you need a quick way to cool drinks.
Key Takeaways
- Combining ice and salt creates instant cold drinks in just 2-3 minutes compared to 10+ minutes using ice alone
- This method cools cans from room temperature (75°F) to refrigerator temperature (41°F) using only household items
- The salt ice bath method works through a scientific process that dramatically lowers the freezing point of water
- No special equipment needed—just ice, table salt, water, and a container large enough for your beverages
- Perfect for emergency situations like unexpected guests, forgotten party prep, or hot summer days
- Works effectively on cans, bottles, and various beverage containers of different sizes
- Understanding the timing and technique ensures perfectly chilled refreshments every time
Why the Salt and Ice Method Works So Well
When you mix salt with ice, you get a fast way to cool drinks. This method cools drinks faster than any other. It creates temperatures that regular ice can’t match.
An ice bath with salt can cool your drink to 5°C in just 2.5 minutes. This is much faster than ice alone, which takes 10 minutes. Freezers and refrigerators take even longer, up to an hour or more.

The secret is the extreme temperatures it can reach. Regular ice can only get to 0°C. But with salt, it can drop to -16°C (about 3°F).
This big drop in temperature is key to its speed.
This method is not just fast. It’s also convenient. You don’t have to plan ahead or worry about drinks exploding in the freezer. You can chill many drinks at once, perfect for unexpected guests.
It’s great for many situations. Use it at home, at parties, on beach trips, or while camping. Its versatility makes it a top choice everywhere.
It also keeps drinks cold for days, not just hours. This makes it perfect for weekend trips or long outdoor events.
| Cooling Method | Time to Reach 5°C | Temperature Capability | Best Use Case |
|---|---|---|---|
| Salt + Ice Bath | 2.5 minutes | Down to -16°C (3°F) | Emergency and rapid cooling |
| Regular Ice Bath | 10 minutes | 0°C (32°F) | Standard party cooling |
| Freezer | 60 minutes | -18°C (0°F) | Advance planning situations |
| Refrigerator | 2.5-10 hours | 4°C (39°F) | Long-term storage cooling |
This method is fast, effective, and easy to use. Simple salt turns ice into a powerful cooling system. It’s the best choice when you need it most.
The Science Behind Salt Making Ice Colder
The magic of salt making ice colder isn’t magic. It’s chemistry. When you mix salt with ice, a cool process happens. This process makes ice colder than usual.
This magic happens at the molecular level. Salt doesn’t just sit on ice. It changes how water molecules behave, creating a cold spot for quick cooling.
How Salt Lowers the Freezing Point of Ice
The key concept is freezing point depression. When salt hits ice, water molecules change. Salt breaks into sodium and chloride ions.
Water molecules are like tiny magnets. They have positive and negative ends. Salt ions attract these molecules, forming a bond.

Water molecules grab onto salt ions. This attraction pulls energy from the environment. This energy drop lowers the temperature.
The solvation process needs energy. This energy comes from the environment. The mixture’s temperature drops as a result.
The dissolved salt also stops ice from forming. This is why salt melts ice. The mixture must cool down more before it freezes again. This is due to colligative properties.
Why the Mixture Gets Colder Than Regular Ice
Regular ice is 0°C (32°F). But salt-ice mixtures can be -16°C to -21°C (3°F to -6°F). This is a 20-degree drop.
This drop makes chilling drinks fast. It’s much colder than regular ice.
The thermodynamics of cooling explains this. Heat moves from warm to cool. A big temperature difference means fast cooling.
When you put a drink in a salt-ice bath, it cools fast. The drink is 20°C (68°F) and the bath is -15°C (5°F). This huge difference makes cooling quick.
The bigger the temperature gap, the faster cooling. Salt-ice is much better than regular ice. It cools drinks in minutes.
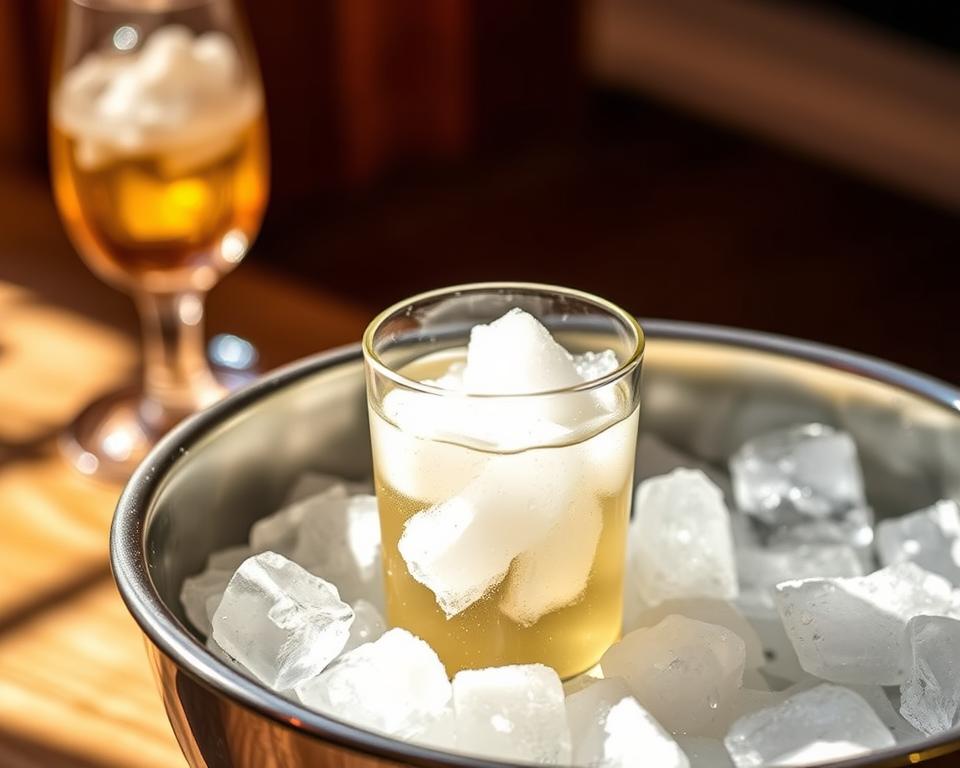
Everything You Need for a Salt Ice Bath
You don’t need fancy equipment for a cold ice bath. Most cooling setup materials are in your kitchen. You’ll need ice, salt, water, and a container. These items cost just a few dollars if you need to buy them.
This method is simple. You don’t need expensive gadgets or special products. Just three everyday ingredients can make temperatures colder than your freezer.

Types of Ice That Work Best
Any ice will work for cooling, but some types are better. Crushed ice is the fastest because it has more surface area for salt to interact with.
Crushed ice from an ice maker or blender works faster. It’s about a minute or two quicker than regular ice cubes.
Standard ice cubes from your freezer trays also work well. They’re what most people have and chill drinks effectively. Two to three trays can chill four to six drinks at once.
Large ice blocks take longer because they have less surface area. Break them into smaller pieces with an ice pick or a spoon wrapped in a towel.
Which Salt to Use for Maximum Cooling
Regular table salt is the best choice for chilling drinks. It’s the cheapest option at your grocery store.
The best salt for chilling drinks is plain sodium chloride. It dissolves quickly and lowers the freezing point effectively. You don’t need to spend extra money on specialty salts.
Other salt varieties also work well if you have them available:
- Kosher salt: Larger crystals that dissolve slightly slower but work just as effectively
- Rock salt: Often used for ice cream makers, very economical for large batches
- Sea salt: Works perfectly but costs more with no added benefit
Table salt has one advantage—its fine granules dissolve faster. This means the cooling process starts immediately. For most situations, a few tablespoons of regular table salt are all you need for a medium-sized container.
Choosing the Right Container
The perfect container for ice bath cooling depends on where you’re using it and how many drinks you need to chill. Your container must be large enough to fully submerge drinks in the ice-salt-water mixture.
Large mixing bowls work wonderfully for home use. A standard kitchen bowl can handle three to four cans or bottles at once. They’re easy to clean and store when you’re done.
Buckets offer more depth and capacity. A five-gallon bucket can chill six to eight drinks simultaneously. They’re especially useful for backyard gatherings where you need to prep multiple rounds of cold beverages.
Coolers are ideal for outdoor events and parties. They provide excellent insulation, which means your ice bath stays colder longer. The thick walls also prevent the cold from dissipating into the surrounding air.
Your kitchen sink can serve as an emergency cooling station. It’s perfect when you need to chill drinks quickly for unexpected guests. Just plug the drain, fill with ice and salt, and you’ve got an instant chilling system.
The container material doesn’t matter much—plastic, metal, or ceramic all work fine. Just make sure whatever you choose can handle cold temperatures without cracking and has enough room for drinks to be surrounded by the mixture on all sides.
How to Get Drinks Cold Fast with Salt: The Complete Method
Chilling drinks quickly involves three key steps. You need the right salt and ice mix, water to help cool, and full contact between drinks and the mixture. Without any of these, you won’t get the fast cooling results.
Following the right steps in using salt ice baths makes a big difference. The right mix of salt, ice, and water drops the temperature fast. This creates a cold environment that cools drinks faster than any other method at home.

The Perfect Salt-to-Ice Ratio
Getting the salt to ice ratio right is easy but important. Use about 2-4 tablespoons of salt for every 2-3 cups of ice. This mix works well for most situations.
More salt means colder temperatures, but only up to a point. For a large cooler, use 1-2 cups of salt per 10-pound bag of ice. A generous sprinkle of salt is all you need.
The salt concentration is key to how cold your mixture gets. Too little salt won’t cool enough. Remember, if you can’t taste the salt, you might need more.
Why Adding Water Is Essential
Water is a crucial ingredient in ice and salt mixtures. Cold water helps the mixture cool drinks evenly. Without water, ice only touches bottles at a few points.
Water makes your cooling setup much better. It fills gaps between ice and covers all surfaces of drinks. This speeds up cooling a lot more than dry ice alone.
Start with cold water, filling your container about one-third. Then add ice and salt. The mixture should be slushy and flow around drinks. This liquid part makes the method much faster than an ice chest.
Submerging Drinks for Full Contact
Properly submerging drinks is very important. Your drinks must be completely surrounded by the salt-ice-water mixture. This ensures even cooling.
Make sure drinks are at least 90% covered. The slush should almost reach the top of bottles and cover cans. Any part above the mixture cools slowly.
If drinks float, add more ice to keep them down. Full submersion cuts cooling time in half. This ensures fast cooling from all sides, giving you quick results.
Step-by-Step Process for Chilling Drinks in Minutes
Want to make warm drinks icy fast? This easy method makes it simple. Just follow each step carefully for the best results. You’ll have cold drinks in no time.
This method works for any event, from barbecues to dinner parties. You likely have everything needed at home. Let’s go through the ice bath procedure for top-notch results every time.
Fill Your Container Halfway with Ice
Choose your container and fill it halfway with ice. For a big bowl or bucket, use 6 to 8 cups of ice. Two trays of ice cubes work great too.
Halfway ice is key for space and cooling power. Too much ice, and you won’t have room for water and drinks. Too little, and cooling won’t be enough.
Don’t worry about exact measurements. A rough halfway mark is fine. The ice is the base of your cold bath, so use plenty.
Add Salt and Mix Throughout
Now, add the secret ingredient: 3 to 4 tablespoons of salt over the ice. For bigger containers, use 5 or 6 tablespoons.
Use a spoon or your hand to mix the salt into the ice. This step is crucial for even cooling. Don’t just sprinkle the salt on top.

Stir the ice and salt for about 30 seconds. This spreads the salt evenly, lowering the freezing point and cooling the bath.
Pour in Cold Water to Create a Slush
This step is often skipped but is vital. Pour cold tap water until it’s two-thirds up your ice level.
The water turns your ice bath into a slushy, effective mixture. Without it, you’d have air pockets slowing cooling. This step is key for fast cooling.
The water should make the mixture cold but not too diluted. If it’s slushy and still icy, you’re good to go.
Place Drinks in the Mixture
Put your bottles or cans into the salt-ice-water slush. Make sure they’re fully submerged or up to the neck. The more they touch the cold mixture, the faster they’ll cool.
If drinks float, add more ice to weigh them down. This keeps them in contact with the cold mixture.
You can chill multiple drinks at once but don’t overcrowd. Each drink needs space for the cold slush to circulate. For a big group, set up multiple stations.
Rotate Bottles Every Minute
Spinning or rotating your drinks every minute is a game-changer. This cuts cooling time nearly in half.
Rotating prevents warm spots and ensures even cooling. The cold spreads faster when you keep things moving. It’s like stirring soup to cool it down.
Use a timer for precision. Spin each drink, then wait a minute. After 2 to 3 minutes, most drinks will be chilled and ready to enjoy.
This whole process is faster than getting cold drinks from a gas station. Plus, you’ll impress everyone with your ability to serve drinks on demand.
Exact Timing Guide for Different Drink Types
Different containers cool at different speeds. Knowing these times helps you plan better. The size, material, and liquid amount of your drink affect cooling times. This guide helps you avoid warm drinks ruining your gatherings.
These times are for drinks at 70-75°F. If they’re cooler, they’ll cool faster. Remember, rotating bottles every minute can cut cooling times by 30-40%.
Canned Sodas and Beer: 3-5 Minutes
Standard 12-ounce aluminum cans cool the fastest. Their thin walls and small volume make them quick to chill. You’ll have ice-cold cans in just 3-5 minutes from room temperature.
Beer cans chill remarkably fast. Most cans reach perfect drinking temperature in 4 minutes. They feel cold to the touch after 90 seconds in salt ice.
Soda chilling times are similar to beer cans. Energy drinks, sparkling water, and other canned drinks cool the same way. With active spinning, they can be perfectly cold in 2 minutes flat.
Glass Beer Bottles: 5-7 Minutes
Glass bottles cool slower than cans because glass doesn’t conduct heat as well. Standard 12-ounce glass beer bottles need 5-7 minutes to chill.
Plan for about 6 minutes to chill beer in glass bottles. The thicker glass slows down cooling. But it’s still dramatically faster than fridge cooling.
Craft beer bottles with thicker glass may take 7 minutes. Check the glass temperature—it should feel cold before serving.
Wine Bottles: 10-15 Minutes
Wine bottles cool slower due to their size and thick glass. A standard 750ml wine bottle needs 10-15 minutes to chill. This is still faster than fridge cooling.
White wine should chill for 15 minutes to be cold. Rosé wines can chill in 12 minutes. This method is great for unexpected guests.
Red wine can chill in 8-10 minutes. The salt ice method lets you control wine temperature by adjusting cooling time.
Two-Liter Bottles and Large Containers: 15-20 Minutes
Large containers like 2-liter soda bottles need 15-20 minutes to chill. They cool faster than fridge cooling. This is impressive for their size.
A 2-liter bottle has nearly seven times the liquid of a standard can. It cools in about four times longer. The salt ice bath cools from all sides, making it efficient.
For large containers, rotate them every 3-4 minutes. This ensures even cooling. By the 18-minute mark, your 2-liter bottle will be perfectly chilled and ready to serve.
Choosing the Best Container for Your Ice Bath
Finding the right container for cooling drinks depends on your needs. The best choice makes chilling drinks easier and more effective. Each type of container has its own benefits for different situations.
You likely have several good options at home. The key is to pick the one that fits your needs best, not to look for something special.
Coolers for Outdoor Events
Insulated coolers are perfect for outdoor events like parties and beach trips. They cool drinks quickly and keep them cold for a long time. A good cooler can even keep drinks cold for days.
Coolers come in all sizes, from small to large. A mid-sized cooler can chill two dozen cans at once. They’re a great investment if you often host outdoor events.
The thick walls of coolers keep the ice bath cold. This means your drinks stay cold for hours longer than other containers.
Large Buckets and Mixing Bowls
A five-gallon bucket is great for cooling drinks at home. These buckets are common and inexpensive. They’re easy to use and store.
Large mixing bowls, tubs, and bins also work well. A bucket can chill a dozen cans at once. Their wide openings make it easy to add ice and pour drinks.
These containers are perfect for quick cooling before serving. They’re also light and easy to move around your kitchen or patio.
Kitchen Sinks for Quick Single-Batch Cooling
Your kitchen sink is a great place for a perfect sink ice bath. It’s ideal for chilling a few drinks quickly. The sink’s drain makes cleanup easy.
A sink ice bath can cool various drink sizes without extra equipment. You can chill tall bottles or wide cans. The drain makes cleanup simple.
This method is convenient because you don’t need to move containers. Just add ice and salt, pour in water, and drop in your drinks. It doesn’t get more convenient than that.
Choose the drink cooling containers that best fit your situation. There’s no one-size-fits-all solution. Just pick what’s most practical for you right now.
Pro Tips to Speed Up Cooling Even More
Want to make your drinks colder, faster? These fast drink cooling tricks will turn you into a pro. The basic salt-ice method is already quick, but these tips can make it even faster. You’ll get ice-cold drinks in just minutes.
These tips work by improving contact and surface area. They also remove temperature barriers. This means you’ll get professional results every time.
The Spinning Technique for 2-Minute Chilling
Spinning drinks is the fastest way to chill them. Spinning drinks to cool them stops a warm layer from forming. This barrier slows down cooling a lot.
To use this trick, put your can or bottle in the salt-ice bath. Hold it firmly and spin it every 30 to 60 seconds. Spin it continuously for 2 minutes to get the best results.
This method works by constantly cooling the warmest part of the liquid. You’ll have a perfectly chilled can in just 2 minutes flat. It’s perfect when you need a cold drink fast.
Shaking or stirring drinks helps distribute temperature evenly. This eliminates warm pockets and cools the drink quickly.
Using Crushed Ice Instead of Cubes
Crushed ice or ice chips cool drinks faster than cubes. They have more surface area for the salt to work with. This means drinks cool down faster.
Crushed ice fits snugly around bottles and cans. This creates more contact and can cool drinks 20 to 30 percent faster. If you have a fridge with crushed ice, use it. Otherwise, break up ice cubes with a rolling pin or meat tenderizer.
Smaller ice pieces mix better with salt and water. This creates a consistent slush that cools drinks evenly. It prevents hot spots that slow cooling.
Pre-Chilling Your Container
Pre-chilling your container is a simple trick. It keeps your ice from cooling down your container. This means your ice works harder to cool your drinks.
This advanced cooling method is great for parties. It keeps your drinks cold longer. Pre-chilling your container means your drinks stay cold without wasting cooling power.
Pre-chilling your container can make a big difference. It keeps temperatures lower longer and helps your ice last. It’s a simple step for consistent results at your event.
For the best results, use crushed ice in a pre-chilled container. Then, spin your drinks for the ultimate rapid chilling experience.
| Technique | Time Saved | Effort Required | Best For |
|---|---|---|---|
| Spinning/Rotating Drinks | 50-60% faster | High (continuous motion) | Single drinks, urgent needs |
| Crushed Ice vs. Cubes | 20-30% faster | Low (equipment dependent) | All situations, multiple drinks |
| Pre-Chilled Container | 10-15% faster | Very low (advance planning) | Parties, maintaining cold longer |
| All Three Combined | Up to 70% faster | Moderate (planning + action) | Maximum speed scenarios |
These fast drink cooling tricks take your results from good to amazing. Using them together creates a system that cools drinks super fast. Choose the methods that fit your needs and enjoy perfectly chilled drinks whenever you want.
Mistakes That Ruin Your Quick-Cooling Results
Getting your drinks cold can be a challenge. Many people try the salt and ice method but don’t get the results they want. This is often because of small mistakes that can make a big difference.
Knowing what not to do can help you get cold drinks every time. Let’s look at some common mistakes and how to avoid them.
Being Too Conservative with Salt
Using too little salt is a big mistake. People often add just a little salt and wonder why their drinks aren’t cooling fast enough. This small amount of salt doesn’t work well.
Salt is cheap, so don’t be shy with it. You need a generous amount to really lower the freezing point. If you can’t see the salt on the ice, you haven’t used enough.
Research shows that using the right amount of salt can chill drinks in 2.5 minutes. But using too little can take 10 minutes or more. So, add more salt than you think you need.
Forgetting to Add Water
Another mistake is forgetting to add water. Some people think they can just sprinkle salt on ice and place drinks on top. But this doesn’t work well.
Water is essential because it creates a liquid bath around your drink. Without water, the ice only touches the drink at a few points. This makes cooling much slower.
The water also helps spread the salt evenly and makes a slush that cools better. Never skip adding water if you want it to work.
Overcrowding Your Container
Putting too many drinks in one container is another mistake. When containers are too full, the cold mixture can’t move around each drink well. This makes cooling uneven and takes longer.
Drinks need at least one inch of space for the liquid to move around. Think of it like air in an oven—too much stuff reduces efficiency. If you have many drinks, do them in batches rather than all at once.
For parties, consider setting up two cooling stations instead of one. This extra space lets the cold mixture work better on every drink.
Distributing Salt Unevenly
The last mistake is not mixing the salt well. When salt is not spread out, you get cold spots and warm spots in the same container. Some drinks get cold, while others don’t.
Take a few seconds to stir and mix the salt into the ice as you add it. Sprinkle it in layers for big containers. This makes sure the temperature drops evenly.
Even distribution also helps the salt dissolve better when you add water. This creates a consistent slush instead of icy pockets with too much salt.
| Mistake | Why It Fails | Quick Fix | Impact on Cooling Time |
|---|---|---|---|
| Too little salt | Insufficient freezing point depression | Use 1-2 cups per bag of ice | Adds 5-8 minutes |
| No water added | Limited surface contact with drinks | Add cold water to create slush | Reduces effectiveness by 60% |
| Overcrowded container | Poor circulation around drinks | Leave 1-inch spacing between items | Adds 3-5 minutes |
| Uneven salt mixing | Creates temperature variations | Stir thoroughly while adding salt | Causes inconsistent results |
These mistakes are easy to avoid once you understand the science. The salt and ice method works great when done right. But cutting corners on any step can ruin your results.
This method relies on chemical reactions and heat transfer. Each part—salt amount, water, spacing, and distribution—plays a key role. Skipping or shortchanging any part messes up the whole process.
How Salt Cooling Compares to Other Methods
Let’s compare the salt-ice technique with other cooling methods. When you need drinks cold fast, knowing the differences is key. This comparison shows what each method can do.
Some methods chill drinks up to ten times faster than others. This knowledge saves time and keeps drinks cold.
The Power Difference Between Salt and Plain Ice
A salt-ice bath cools drinks to 5°C (41°F) in just 2.5 minutes. Regular ice takes 10 minutes. That’s a big speed difference.
Regular ice is 0°C (32°F), but salt-ice drops to -16°C (3°F) or colder. This bigger temperature difference cools drinks faster. Also, salt-ice ensures full contact with containers, unlike regular ice.
Plain ice is okay when you have time. But for speed, adding salt makes a huge difference. The best drink cooling method combines both.
Why the Freezer Takes So Much Longer
Many use the freezer for quick chilling. But, it takes a full 60 minutes for cans and up to 90 minutes for bottles. That’s much longer than salt-ice.
Freezers can also freeze drinks solid or make carbonated drinks explode. Salt-ice prevents these issues.
The freezer is easy to use but not when guests arrive unexpectedly. The salt method is faster and safer.
Beating the Wet Paper Towel Trick
The wet paper towel trick is a freezer hack. It wraps a damp paper towel around your drink and freezes it. This method cools drinks faster than the freezer alone.
This trick cools drinks in 15 to 20 minutes, which is faster than the freezer. But it’s still slower than the salt-ice bath. You also need freezer space, which can be a problem.
The paper towel method is good for one or two drinks. For more drinks or urgent needs, the salt bath is better.
| Cooling Method | Time for Cans/Small Bottles | Time for Large Bottles (1.5L) | Advantages | Disadvantages |
|---|---|---|---|---|
| Salt + Ice Bath | 2.5-5 minutes | 15-20 minutes | Fastest method, handles multiple drinks, no explosion risk | Requires ice, salt, and active monitoring |
| Regular Ice Bath | 10 minutes | 20-25 minutes | Faster than passive methods, no special ingredients | Much slower than salt version |
| Freezer | 60 minutes | 90 minutes | Hands-off, no setup required | Very slow, risk of freezing/exploding |
| Wet Paper Towel + Freezer | 15-20 minutes | 30-40 minutes | Faster than plain freezer | Requires freezer space, messy, still slow |
| Refrigerator | 2.5-4 hours | 5-10 hours | Gentle, consistent cooling | Extremely slow, requires planning |
This table shows the salt-ice method is the clear winner. It cools drinks faster than any other method. When speed is key, it’s the only choice.
Other methods have their uses. The fridge is great for planning ahead, and the freezer for overnight prep. But for drinks cold right now, the salt-ice bath is unmatched.
Science backs up the data: colder temperatures and better contact mean faster cooling. The salt method uses both to its advantage, making it the best choice.
Making This Work for Parties and Events
Scaling up the salt and ice method for parties changes how you chill drinks for events. For big gatherings, you need to plan ahead. With the right amounts and setup, you can keep drinks cold for dozens without constantly buying more ice.
The secret to success is knowing how much ice you need and setting up an efficient workflow. This method is perfect for backyard barbecues, birthday parties, weddings, and any event where cold drinks are important.
Calculating How Much Ice and Salt You Need
Start with a simple formula for smart party ice calculations. Plan for 1-2 pounds of ice per guest for a 4-hour party. Add 10-20% more ice if you’re using the salt method for quick chilling.
For salt, use about 1-2 cups of salt per 10 pounds of ice in your rapid-chilling station.
For a party of 20, you’ll need 30-40 pounds of ice and 3-4 cups of salt for the initial chilling station. This covers both the quick cooling and keeping drinks cold all day.
Always buy more ice than you think you’ll need. Leftover ice is great for the freezer, but running out mid-party is stressful. Most hosts find that overestimating by 20% is a good safety margin.
Setting Up Multiple Cooling Stations
Setting up professional cooling stations involves creating two zones at your event. This ensures cold drinks are always available without overloading one cooler.
Your first station is the rapid-chilling zone. Use a large cooler or bucket with the salt-ice mixture for party drink cooling. Place a sign nearby: “Fresh drinks ready in 5 minutes.” This station handles new bottles and cans that need quick cooling.
The second station has regular ice without salt. It holds drinks that are already cold and keeps them at the perfect serving temperature. Guests can grab drinks from this cooler all day.
This two-station setup prevents bottlenecks. Move drinks from the salt bath to the regular ice cooler after they chill for 5 minutes. The rapid-chilling station stays ready for the next batch of warm drinks.
For events with 50+ guests, set up multiple rapid-chilling stations in different areas. This prevents crowding and ensures everyone has easy access to cold drinks.
Keeping Drinks Cold After Initial Chilling
After drinks reach their ideal temperature with the salt method, they need proper storage for large-scale cooling success. The salt mixture is great for quick cooling but not for all-day storage.
Move chilled drinks to coolers with regular ice only. The salt bath melts ice too fast, which wastes your ice supply. Regular ice in insulated coolers keeps drinks cold for hours without melting too quickly.
Quality coolers can keep drinks cold all day at outdoor events. Experienced party hosts say a well-packed cooler with a 50/50 ice and drink mix keeps temperatures steady for most gatherings.
For long events, add fresh ice to your storage coolers every few hours. Keep the drain plug closed unless water rises above the ice level. That cold water helps keep temperatures low.
Here’s a simple comparison of storage methods for event beverage chilling:
| Storage Method | Cold Duration | Ice Efficiency | Best Use Case |
|---|---|---|---|
| Salt-ice mixture | Rapid cooling only | Low (melts fast) | Initial chilling station |
| Regular ice in cooler | 6-8 hours | Moderate | Active serving areas |
| Insulated cooler with ice | 12-24 hours | High | Long-term storage |
| Regular bucket with ice | 2-3 hours | Moderate | Quick access points |
Pre-chill your drinks the night before if you can. Starting with refrigerator-cold beverages means your salt bath works faster, and you’ll use less ice. This simple step makes party planning easier.
Stock up on ice the day before your event. Most stores sell ice at good prices. Buying ahead of time saves you stress and lets you enjoy your party more.
Conclusion
The salt ice method is incredibly effective. It cools drinks from 75°F to 41°F in just 2 minutes. This is faster than any other method, including freezers and refrigerators.
This method uses just three things: ice, salt, and water. The salt lowers the freezing point, making the mixture colder than ice. This makes drinks ice-cold in 2-5 minutes, much faster than usual.
The science behind it is simple. Salt lowers water’s freezing point to around 3°F. This is colder than regular ice at 32°F, making it more effective.
You can use this technique anywhere. It’s great for beach trips, backyard cookouts, or unexpected guests. Keep salt with your cooler supplies. It’s cheap and never goes bad.
To cool drinks quickly, fill a container with ice and add salt. Pour in cold water and submerge your drinks. Spin them for even faster cooling.
Try this method next time you need cold drinks fast. It will impress you and your guests. Share it with friends who always complain about warm drinks at parties. Your drinks will be chilled before anyone else’s.